Prologue
In the previous blog here, we reverse engineered a simple binary containing plaintext password in Linux with the help of GNU Debugger (GDB). In this blog however, we will be using the same source code of the binary but compile and debug it in Windows. Reverse engineering tools in Windows are highly different from that of Linux, but on the assembly level, it would somewhat be the same. The only difference you would find would be the kernel level calls and the DLLs which would be of Windows rather than the libraries of Linux. This is however a re-posting of my own blog from here.
In this post, I will be using x64dbg since I wasn’t able to find a version of x64 Immunity debugger or Olly Debugger to reverse engineer the binary. However, below are alternatives along with the download links which you can choose. If you are able to find other x64 debuggers for windows, do add them in the comment and I will mention them here.:
Immunity Debugger is an awesome tool if you are debugging x86 binaries. However, since we are only focusing on x64, we will have to use x64dbg which supports both x86 and x64 disassembly.
Once you have downloaded the required debugger, you can compile the source code which is uploaded on my Git repo here. You can compile the binary in Windows with the below command:
$ g++ crack_me.cpp -o crack_mex64.exe -static -m64
Make sure you use a 64-bit version of g++ compiler else it will compile but won’t work. You can also download the binary from my repo mentioned above. I prefer to use the Mingw-x64 compiler, but some also use clang x64. It all boils down to the preference of which one you are familiar with.
Disassembly
Once you have compiled the binary, let’s load it up in x64dbg. Remember, that our binary accepts an argument which is our password. So, unlike GDB where we can supply the argument inside the GDB; in Windows, we will have to supply it during the loading of binary via the command line itself.
To load the binary into x64dbg, below is the commandline you can use:
.\x64dbg.exe crack_mex64.exe pass123
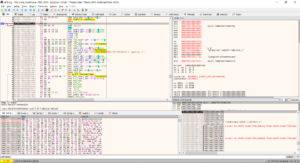
Once, the binary is loaded, you will see six windows by default. Let me quickly explain what these windows are:
The top left window displays the disassembled code. This is the same as disassemble main in GDB. It will walk you through the entire assembly code of the binary. The top right window contains the values of the registers. Since we are debugging a x64 binary, the values of x86 registers for example EAX or ECX will be inside of RAX or RCX itself.
The middle two windows, left one shows you the .text section of the assembly code, and right one shows the fastcalls in x64 assembly. Fastcalls are x64 calling conventions which is done between just 4 registers. I would recommend skipping this if you are A beginner. However for the curious cats, more information can be found here.
The bottom left window displays the memory dump of the binary, and the bottom right shows the stack. Whenever variables are passed on to another function, you will see them here.
Once, the above screen is loaded, we will first search for strings in our binary. We know a few strings when we executed the binary i.e. ‘Incorrect password’, or ‘Correct password’ or ‘help’. As for now, our primary aim is to find the actual password and secondary aim is to modify the RAX register to Zero, to display ‘Correct Password’ since our check_pass() function returns 0 or 1 depending upon whether the password is right or wrong.
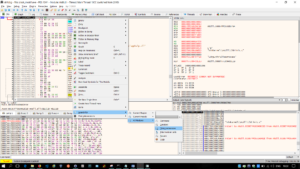
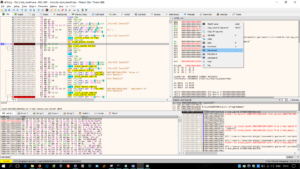
To search for strings, right click anywhere in the disassembled code -> Search for -> All Modules -> String References
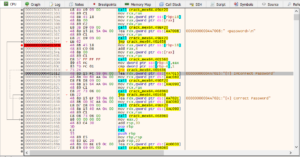
This will bring you to the below screen where it shows you the string Incorrect Password. Since we know there will be a comparison between our input password and the original password before printing whether the password is correct or not, we need to find the same from the disassembled code to view the registers and the stack to search for the cleartext password. Now right click on the ‘Incorrect Password’ area and select Follow in Disassembler. This will display the below screen in the disassembly area:
What I have done over here in the above image, is I’ve added a breakpoint at 00000000004015F6. The main reason for that is because I can see a jmp statement and a call statement right above it. This means that a function was called before reaching this point and the last function to be executed before the printing of ‘Correct/Incorrect password’ is the check_pass() function. So, this is the point where our interesting function starts. Lets just hit on the run button till it reaches this breakpoint execution.
Once, you’ve reached this breakpoint, hit stepi (F7) till you reach the mov RCX, RAX or 0000000000401601 address. Once it is there, you can see our password pass123 loaded on to the RCX register from RAX register. This is nothing but our argument loaded into the function check_pass(). Now, keep stepping into the next registers till you reach the address 0000000000401584, which is where our plaintext password gets loaded into the RAX register.
You can see on the top right window that our password ‘pass123’ and original password ‘PASSWORD1’ is loaded onto the registers RCX and RAX for comparison. The completes our primary motive of getting the plaintext password. Now since our passwords are different, it will be printing out ‘Incorrect password’. We now need to modify the return value of 1 to 0 which is returned by the check_pass() function. If you see the above image, 3 lines below our code where the password is loaded onto the register, you will test EAX, EAX at address 0000000000401590. And we see two jump statements after them. So, if the test value returns they are equal, it will jump (je = jump if equal) to crack_m3x64.40159B which is where it will mov 0 to the EAX register. But since the password we entered is wrong, it will not jump there and continue to the next code segment where it will move 1 to EAX i.e. at address 0000000000401594. So, we just setup a breakpoint on this address by right clicking and selecting breakpoint -> toggle since we need to modify the register value at that point and continue running the binary till it hits that breakpoint:
Once, this breakpoint is hit, you will the value 1 loaded into the RAX register on the right-hand side. The EAX is a 32 bit register which is the last 32 bits of the RAX register. In short,
RAX = 32 bits + EAX
EAX = 16 bits + AX
AX = AH(8 bits) + AL(8 bits)
and so on.
Therefore, when 1 is loaded into EAX, it by default goes into RAX register. Finally, we can just select the RAX register on the right-hand side, right click and decrement it to Zero.
Epilogue
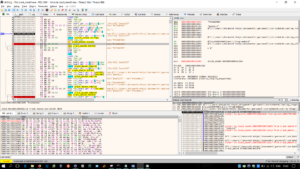
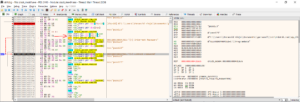
And then you should see that RAX is changed to Zero. Now continue running the binary till it reaches the point where it checks the return value of the binary as to whether its Zero or One, which is at address 000000000040160C. You can see in the below image that it uses cmp to check if the value matches to 1.
It uses the jne (jump if not equal) condition, which means it will jump to crack_mex64.401636 if its is not equal to One. And crack_mex64.401636 is nothing but our printing of ’Correct Password’ at address 0000000000401636. You can also see in the register that our password is still pass123 and inspite of that it has printed it’s the correct password.
This would be it for the cracking session of windows for this blog. In the next blog, we will be looking at a bit more complex examples rather than finding just plaintext passwords from binaries.


Vicky
thanks, this is useful since i am studying about reverse engineering. Can i use some points in my assignment? thanks